
Medium-like text highlighting in React
This is another post from a series of posts about what Growth Engineers do. This particular article is about increasing customer engagement and loyalty by broadening the Bottom of the Funnel (BoFu), a term frequently used by marketing and sales teams that also ends up being part of a Growth Engineer's daily routine.
Even though customer acquisition is one area that gets the most attention from startups, product engagement is just as important. Think about an investment portfolio; you could either invest all your money on short-term stocks, have immediate liquidity, or invest it in long-term stocks and have much better returns. However, it is usually a safer bet to have a balance of both. The same applies to products.
Let's take Pokemon Go as an example. It had a speedy user acquisition, players were obsessed with it for a time, but that was it; their product did not stick. Here is an article that gives an excellent overview of how to build stickiness into your product.
The ROSS growth team was tasked to build a Medium-like text highlighting to balance user acquisition and user engagement. Following are some customer requests to validate its importance:
"Can you highlight? And if so can you highlight in multiple colors? This would be a great design feature"
"... there is no apparent manual highlighting function when reading cases. If I find some text that I feel is pertinent, I need the ability to highlight same."
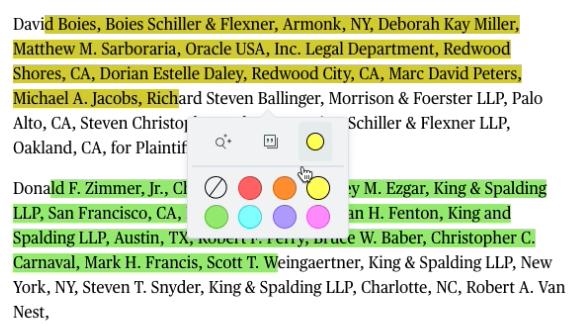
The following is a gif showing the first iteration of the Medium-like text highlighting working in production. I've written about how we tackled the estimation of this project using a different approach that I describe in this article.
The next sections will provide a technical overview of the implementation of this feature and the challenges we faced, and some links to articles that can serve as fonts of inspiration.
Considerations and First Steps
Requirements are well defined, so it's time to estimate its implementation. But first, do we need to reinvent the wheel? There must be some React or Javascript library that does that for us, right? Well, in this case, not entirely. It proved to be a challenging area with intersections with other highlighting-related features, such as syntax highlighting.
When searching specifically for "Medium-like text highlighting" we mostly find libraries and articles referring to the Floating Action Menu, which is a part of it, the first part, but not all. The second part, which the keywords "content selection and highlighting" produces better results and inspiration, is the most challenging.
We ended up implementing both the Floating Action Menu and the Content Selection and Highlighting from scratch. However, it's still valuable to mention what we found along with our time-boxed research because it may serve as inspiration if your team needs to build something similar. Additionally, I will provide some code snippets of our in-house solution.
Floating Action Menu
There are a couple of Javascript (such as TinyQ ) and React (such as react-highlight-pop) libraries that provide a Floating Action Menu out of the box, but they are limited on what we can do in terms of behavior and styling.
We implemented the floating action menu at ROSS using styled-components (CSS for the component age). To get the text and its position in the document, we used the browser's window.getSelection, and a library called xpath-range. That library gives us the path to the highlighted text in an XPath format, such as div[2]/p[7]/text[1], which means second div, seventh paragraph, and the first chunk of text, for instance. The text part can have multiple indices because other HTML tags split the text in a section, such as hyperlinks and bold. Xpath also provides the start and end offset to allow the highlighted text to be recreated once loaded in that format.
npm install xpath-rangeThe code snippet below provides three functions:
- getSelection(): it pretty much returns metadata about the text that has been selected. You can learn more about window.getSelection here
- getXPathParameters(xpath): this function returns the xpath, start, and end offset of the selection, as explained above.
- onHighlightAction(params): We are using redux, so this action will build an annotation object of type highlight and dispatch a saveUserUserAnnotation that will save metadata to the database (more details to follow under the database model session). That metadata is then used to reconstruct a highlighted text once a user refreshes or loads that page again.
import { fromRange } from "xpath-range"
  import { v4 as uuidv4 } from "uuid"

  function getSelection() {
    if (window.getSelection) {
      return window.getSelection()
    }

    if (document.selection) {
      return document.selection
    }

    return null
  }

  const getXpathParameters = xpath => {
    const startOffset = xpath.startOffset
    const endOffset = xpath.endOffset
    let startContainer = xpath.start
    // /div[2]/p[7]/text()[1] -> /div[2]/p[7]/text[1]
    startContainer = startContainer.replace(/(|)/g, "")
    let endContainer = xpath.end
    endContainer = endContainer.replace(/(|)/g, "")
    return { startOffset, endOffset, startContainer, endContainer }
  }

  export function onHighlightAction(
    colorName: string,
    decision: Decision,
    setShowToolTip: (value: boolean) => void,
    userAnnotations: UserAnnotationsActions
  ) {
    let text =
      (ContentSelector.getSelection() &&
        ContentSelector.getSelection().toString()) ||
      ""

    if (!text || text === " ") {
      setShowToolTip(false)
      return
    }

    const selection = getSelection()
    if (selection.rangeCount > 0) {
      const range = selection.getRangeAt(0)
      const content = document.getElementById("decision-reader-body-root")
      let xpath = null
      if (content) {
        xpath = fromRange(range, content)
      }
      if (xpath) {
        try {
          let {
            startOffset,
            endOffset,
            startContainer,
            endContainer,
          } = getXpathParameters(xpath)
          const highlightId = uuidv4()
          const typename = "highlight"
          userAnnotations.saveUserAnnotation(
            text,
            colorName,
            decision.id,
            highlightId,
            startOffset,
            endOffset,
            startContainer,
            endContainer,
            typename
          )
        } catch (e) {
          console.error("user highlight failed: ", e)
        }
      }
    }
    setShowToolTip(false)
  }
You should also consider storing the text itself so that you can do a fuzzy match as a fallback in case of HTML changes. To be even safer, you could also keep a couple of words that proceed and succeed the selection to cover edge cases where a single word is highlighted, and in that case, a fuzzy match would not help recreate the selection.
Content Selection and Highlighting
Here comes the most challenging part, once we have the xpath, how do we dynamically wrap the text around a class setting a different background color? Knowing that we can also reconstruct all saved highlights once a document is opened.
It turns out there are not that many libraries out there that could do this for us. The "10 text highlighter javascript libraries" blog post is a good start, and the Javascript Texthighlighter library (Github, Demo link) seems an excellent fit for us. Unfortunately, it did not work for our use case.

So, we ended up also building the text highlighting logic from scratch by leveraging another library called react-html-parser:
npm install react-html-parserThe code snippet below provides a high-level overview of how it works. It allows us to preprocess the list of userAnnotations (along with other annotations like footnotes and system passages) and wrap React components around them so that the ReactHtmlParser can take the raw HTML and transform it into React components. That's the general idea, and that's where the logic to wrap the text with highlightedText components live.
const preprocess = React.useCallback(
    (nodes: DomElement[]) =>
        preprocessNodes(footnotes, passages, userAnnotations, nodes),
      [passages, userAnnotations]
    )

    const transformHtml = React.useCallback(
      (node, index) => transform(node, index),
      []
    )

    const processedHtml = React.useMemo(
      () =>
        ReactHtmlParser(html, {
          transform: transformHtml,
          preprocessNodes: preprocess,
        }),
      [html, preprocess]
  )
The highlight itself presents several challenges because your HTML will likely contain other tags, such as <a href=""/> and bold <b>bold</b> tags, so you have to decide whether you want to add a highlight class to each word, or break it down into chunks of text and give them a CSS class. The post below ("How to let users highlight your HTML") covers super well the pros and cons of each approach.
Database Model
Great, we have a general idea of how the frontend works, but how about the backend? What is the best way to represent text highlighting? We called the model a user annotation because it could grow to user comments and user sharing, making it scalable even though it's only text highlighting for now. We have also chosen to use a No-SQL database (AtlasDB) because it's scalable and a perfect use case for text storage. And we decided to follow the Web Annotation Data Model (W3C) format.
Following is an example of the data that is saved to the database. As you can see, we are using two W3C Selectors, a W3CRangeSelector which is then consumed by the frontend to recreate a highlighted text, and a W3CTextQuoteSelector as a potential fallback in case HTML changes in the future.
{
  "_id": "ac93635f-689d-4d8b-a17b-3e8786b943f8",
  "ownerId": "usr-4d0ee82b-b095-4a8d-8df0-d812c3ad2461",
  "createdAt": 1607511518406,
  "lastModified": 1607511518406,
  "w3cAnnotation": {
    "type": "Annotation",
    "body": [
      {
        "type": "TextualBody",
        "value": null,
        "jsonValue": {
          "meta": {
            "color": "yellow"
          }
        },
        "id": null,
        "format": "application/vnd.ross.user-highlight-meta.v1+json"
      }
    ],
    "target": {
      "type": "W3CWebAnnotation",
      "source": "decision:13349956",
      "selector": [
        {
          "__typename": "W3CTextQuoteSelector",
          "exact": ""An action to enforce an affidavit of support . . . may be brought against a sponsor in any appropriate court." 8 U.S.C. 1183a(e). However, a trial court's judgment must be supported by the pleadings. Tex.R.Civ.P. 301.",
          "type": "TextQuoteSelector"
        },
        {
          "endOffset": 89,
          "startOffset": 1,
          "__typename": "W3CRangeSelector",
          "endContainer": "/div[2]/div[3]/p[4]/text[2]",
          "type": "RangeSelector",
          "startContainer": "/div[2]/div[3]/p[4]/text[1]"
        }
      ]
    }
  }
}
I hope you liked this article! Have a great day!